Install the Chatsy chat widget on your website
Add Chatsy to a site with one script tag before the closing body tag. Where to copy it, platform notes, how to test, how to remove it and common fixes.
Updated
Chatsy's widget is one script tag. Copy it from your agent, paste it just before the closing </body> tag on every page where the chat bubble should appear, and turn on public access. The script loads the chat bubble in the bottom-right corner and connects it to that agent. There is no plugin to install and nothing to configure on your server.
Copy your script
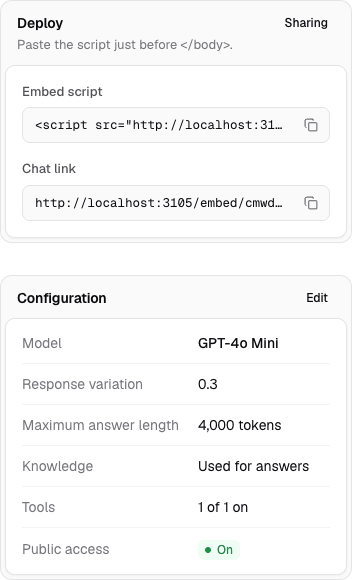
Open the agent in the dashboard and use either place:
- Overview → Deploy. The panel says "Paste the script just before </body>." and has two fields: Embed script and Chat link.
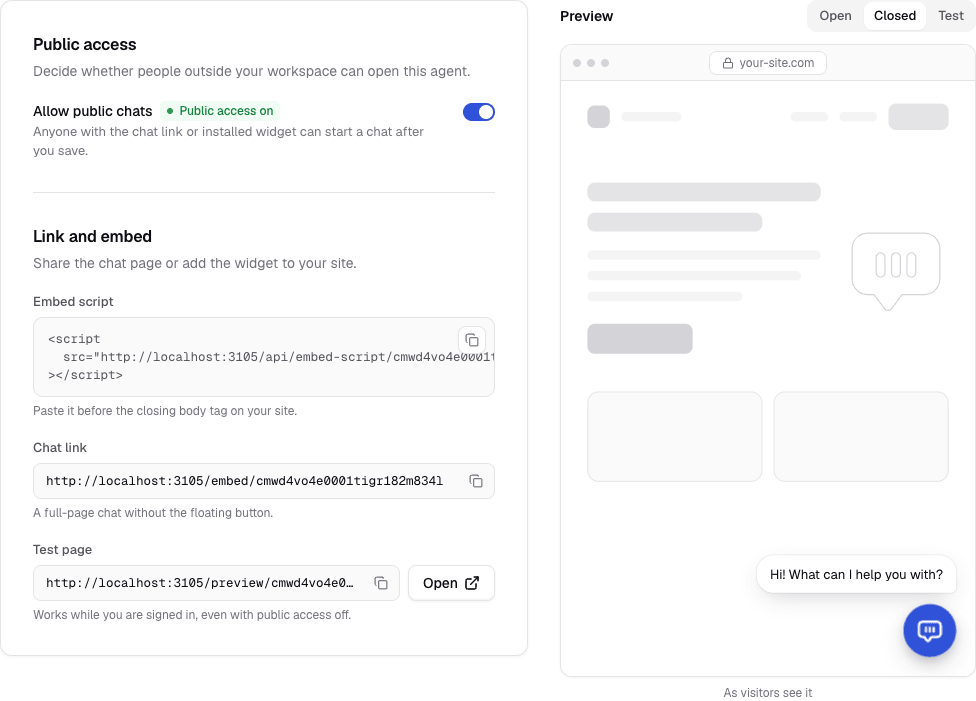
- Settings → Sharing → Link and embed. The same script, plus the hosted chat link.
The script looks like this, with your agent's ID in the path:
<script src="https://chatsy.app/api/embed-script/YOUR_AGENT_ID"></script>Copy it from the dashboard rather than typing it, so the ID is exact.
Turn on public access first
The script only loads for agents with Allow public chats switched on. With it off, the script returns nothing and the Overview shows "Public access is off, so the script will not load yet." This lets you install the script early and launch later by flipping the switch.
Where to paste it
Paste the script once, in a place your site repeats on every page (a site-wide footer or the main layout template), just before </body>. If you only want the widget on some pages, paste it into those pages' templates instead.
Each site builder has its own custom-code setting. Chatsy has step-by-step guides for the common ones:
| Platform | Where the script goes | Guide |
|---|---|---|
| WordPress | A Custom HTML block, or the theme area where site-wide scripts are managed | WordPress |
| WooCommerce | The WordPress theme or Custom HTML area used for site-wide scripts | WooCommerce |
| Webflow | The site's custom code settings, or an Embed element on one page | Webflow |
| Wix | The site's Custom Code settings | Wix |
| Squarespace | Code Injection, or another custom-code area your plan allows | Squarespace |
| BigCommerce | Storefront > Script Manager | BigCommerce |
| Shopify | The theme's theme.liquid file, before </body> | Shopify status |
Some builders only allow custom code on paid plans, and plan names change. The platform guides above link to each builder's own documentation so you can check before you start.
Shopify: Chatsy has no Shopify app or connector; a native connection is planned. Adding the script to a theme is the same as any other site, but Chatsy has not yet verified a full install and removal on a live Shopify store. Duplicate your theme first, as Shopify recommends before any code edit.
Customize before you publish
Set the widget's look in Settings → Widget. Changes apply to the installed script without re-pasting it.
| Setting | What it changes |
|---|---|
| Agent icon and Primary color | The bubble and header |
| Welcome message and Message field placeholder | What visitors see first |
| Suggested questions | One-tap questions under the welcome message |
| Opening messages | Short messages shown above the bubble |
| Privacy policy URL | A link in the widget footer |
| Hide Chatsy branding | Removes "Powered by Chatsy" (Standard plan and above) |
The bubble always sits in the bottom-right corner; there is no position setting.
Language: the widget's buttons and labels are available in English and Spanish. Chatsy uses the script's data-locale attribute if you add one, then a ?locale= value on the script URL, then your page's <html lang>, then the visitor's browser language. Anything other than English or Spanish shows English.
Test the install
- Open your site in a private browser window, so you see what a new visitor sees.
- Check the bubble appears on every page where you expect it, on desktop and on a phone.
- Ask a question your content answers and one it does not. The second should not produce a made-up answer.
- If live chat is on, ask for a person and confirm the conversation reaches Live chat in the dashboard. See Hand conversations to your team.
- Open the agent's Conversations page and confirm your test chats are listed.
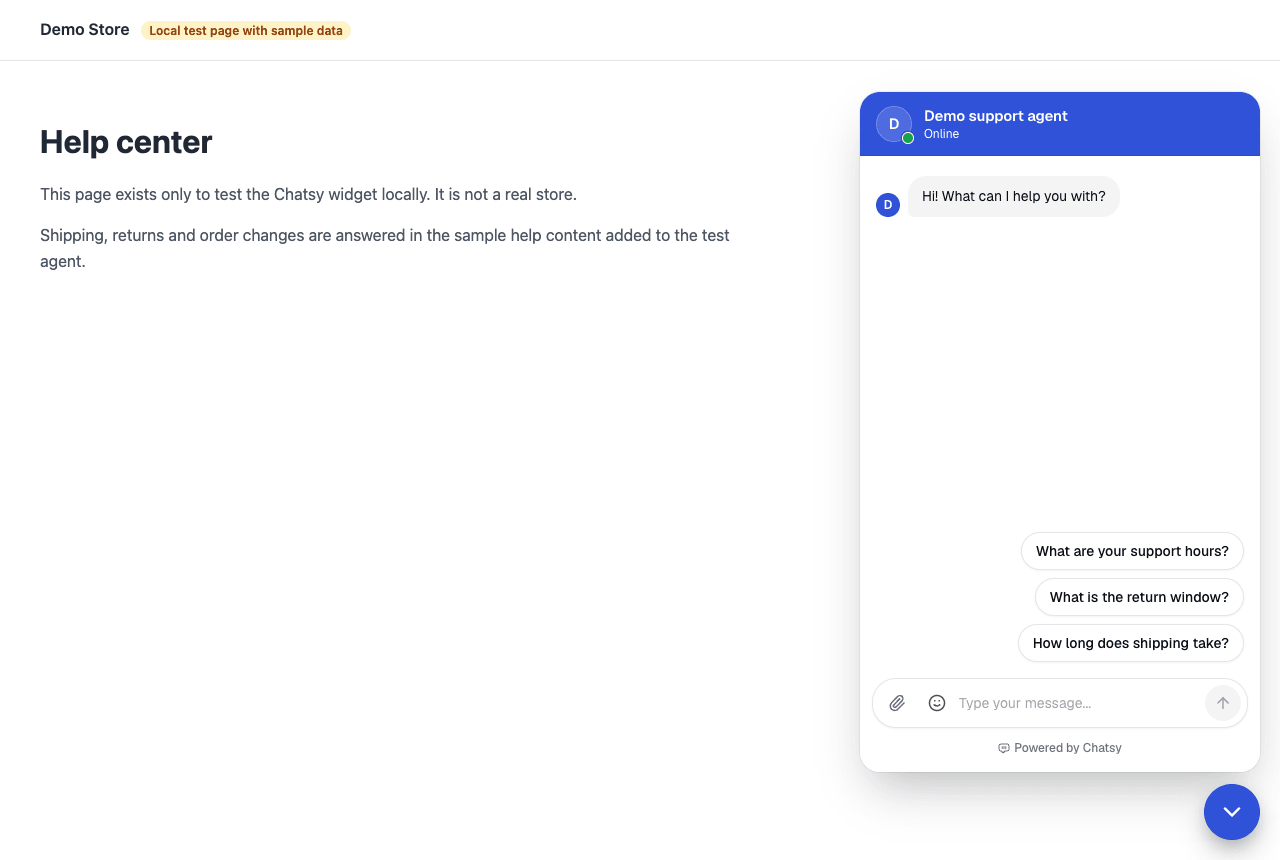
To test without touching your site, use the private preview link in Settings → Sharing, which only you can open.
Remove or pause the widget
- Pause: switch off Allow public chats. The script stays on your site but loads nothing. Turn it back on to resume.
- Remove: delete the script tag from your site or template and publish. If you pasted it through a builder's custom-code setting, clear that field.
- Undo a theme edit: if you edited a theme file directly, restore the previous version with your platform's file history or the theme copy you made before editing.
Troubleshooting
| Symptom | Likely cause | Fix |
|---|---|---|
| No bubble appears | Public access is off | Turn on Allow public chats |
| No bubble on some pages | Script is only in some templates | Move it to the shared footer or layout |
| No bubble anywhere, access is on | The builder strips scripts on your plan, or the site's Content Security Policy blocks external scripts | Check the builder's custom-code requirements; allow https://chatsy.app in your CSP script-src (the loader script) and frame-src (the chat window loads in an iframe from /embed/) |
| Two bubbles | Script pasted twice (for example, in a theme and in a plugin) | Keep one copy |
| Old answers after you changed a page | The source was not re-read | Re-read it on the Knowledge page |
A security note
Chatsy does not restrict the widget to your domain. Anyone who copies your public script can load your agent on another site, and their visitors' questions would use your credits. If that would be a problem, keep public access off until launch and watch the Conversations page for traffic you do not recognize.